
Guide to Walks Manager in 5 easy steps!
Registered walk leaders for Bristol group can add their own walk details to Walks Manager. You will not be able to publish your walk. Once the allocated walks coordinator has checked it, they will publish it, after which it will show in the Bristol Walks Programme on the Bristol Ramblers website, and the Ramblers App and Walk finder. Once the walk has been published you can edit it yourself from then on if you need to via Walks Manager.
Please don’t be put off by the length of these instructions. They will make sense when you start to use Walks Manager. Each of the steps corresponds to 1 page.
Logging on to Walks Manager
Visit the National Ramblers website https://www.ramblers.org.uk/ and click on the Sign In at the top of the page.
(If the login screen keeps reappearing, click where it says, "Not your account?" and try it again).
The link to Walks Manager is https://walks-manager.ramblers.org.uk
This takes you to the Walks Manager Welcome screen (you may be asked to log in again. Use the same login and password).
How to Add a Walk
Click on List View at the top of the screen. (You may need to click on ≡ if you can't see this). This gives a list of the Bristol Group Walks already added. Most are published but some are draft. A walk must be published to show up in walk listings on our website. A draft walk can’t be seen elsewhere until it is published-so can act as a place holder while you finalise details. There is a delete option at the end of the process if necessary! Note that this system is very slow to respond and will require your patience.
Step 1 of 5
Click on Create at the top right of the screen and select Add a walk.
(Once all the information is added you will be able to: preview the walk, correct it, or submit it for publication, or delete it.)
Provide some basic information on your walk.
Title of your walk
Add the title of your walk here and append the grade (A), (AHW), (BHW), (B) or (C).
Date of walk & walk start time
Add the date here in the first box followed by the box next to it which asks for the walk Start Time 🕓 (When the actual walk starts- not meeting time for carsharing)
Walking group
You need to select Bristol group to bring up the Walk Leaders List
Scroll down the list and select the box left of the leader's name.
If the leader's name doesn't appear in the list, contact your Walks Co-ordinator, or Tony P.
Click on Save and continue to go to next step. (This won’t work if you haven’t selected a leader or completed any action with a red star next to it.)
Step 2 of 5
Description
Descriptions and highlights of the walk should be added here. (Meeting details and start point details are not needed until later)
Additional Details
Give information which is helpful for those joining the walk e.g., steep ascents, bring a National Trust card, no pub/pub at end.
Facilities, Accessibility, and Transport
Click any of the additional facilities that apply, and this will flag up on the published walk details.
Add up to 5 images – (Optional photo upload)
You are encouraged to upload an appropriate photo from the photos on your computer if you know how to do this.
Click on 'Save and Continue'
If you just want to reserve a date for your walk you can stop here. Click on The Save changes option in the Walk Editor column on the right hand side. This will reserve your date.
Step 3 of 5
What are the location details?
Select Circular or Linear
(Linear walks will require an additional finishing point)
If you have a meeting point for car sharing, click on the box My walk has a separate meeting point.(Where you meet for car-sharing)
(If not skip to Starting Point below)
Add a Meeting time🕓- (this will be earlier than your start time already entered previously.)
At Enter a meeting point(where you meet for car sharing)
You will need to enter a postcode, or grid reference or place name. Choose below:
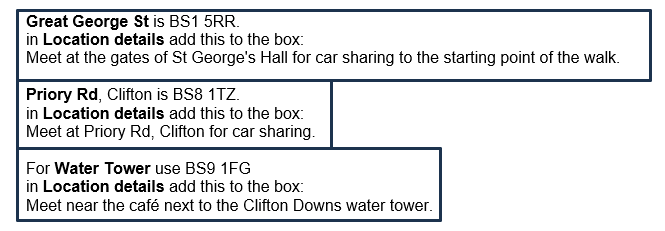
The position can be adjusted by moving the pin on the map.
Return to the Starting point tab, further up the page in the tab next to the Meeting point tab.
Location
Starting Point (you don’t need to add a start time as you should have already entered this at the beginning)
Enter a starting point.
This box will accept a grid reference, a postcode or place name. Although place names can be used this may cause automatic postcodes to be generated, which may or may not be where you plan to start from.
Top Tips
For best results, use a grid reference and put as much detail in the Location details box as you can.
(Don't forget there is a parking place listing page with grid references- for the time being.)
Nearest post code
This will fill itself in from your other details.
Location Details
Put as much address information in this box as possible to describe your starting point.
Generally for Sunday walks, where a starting place is identified, add this text: The location shown is only indicative. If you wish to join the walk, contact the walk leader for start details.
Click on Save and continue.
Step 4 of 5
Select the walk grading:
for A, AHW or BHW walks this will be Strenuous
for B walks this will be Moderate
for C walks this will be Leisurely
Ascent details are optional but recommended for hilly walks.
Give the Distance and Estimated finishing time🕓: it insists on having a finish time. This is displayed as an estimate.
Press 'Save and Continue'
Step 5
You can now preview the walk.
If it is OK and you are a walk coordinator you can publish it.
If something needs changing you can go to the Walk Editor (top right of screen) and select which part of the information you want to go back to, so you can change it.
You may need to Save any changes using the save option.
If it's just a test walk you can delete it. The walk will be saved as a draft unless you delete it.
If you are not a walk coordinator, then you will need to submit it for checking – The walk coordinator will check it and publish it. Once published you can still edit in Walks Manager and your (saved)changes will be updated everywhere instantly.
⚠ Finally, do remember to inform your walk coordinator that you have uploaded a walk for checking!
Any queries contact Sarah
In some cases it may be easier to copy and then modify details for an existing walk rather than starting from scratch.
This can be done by going to Table view, ticking the box to the left of the walk to be duplicated and then clicking on Duplicate at the top left of the screen.
Towards the end of the walk isting there are two walks Template Sunday A and Template Sunday B.
These are useful starting points for Sunday walks as they include details for the meeting place.
